We decided to take our little 13-foot-trailer, dubbed “The Travelling Bordello”, for her initial run. Wife, dog and I took a week off from our schedules and set out for Port Renfrew and Victoria. We arrived outside of Port Renfrew (pop. 300 or so) on a Friday afternoon and found a campsite where we could camp right at the edge of the sand for $20 per night.
What a million-dollar view from our little trailer. I took out ye auld Nikon D300s and walked down the beach. It was cloudy and getting dark so I dialled in a 400 ISO. I didn’t want a high ISO in case I had a great shot that I wanted to blow up to a large size.
I have shot at ISO up to 6400—now that is “noise”. On this trip the highest that I went was to 1600 ISO just to be able to shoot in the near-dark.
Believe me, you never know what incredible shot could be 20 feet from here. I have learned to pre-set the camera in case an incredible photograph should appear: then I am ready.
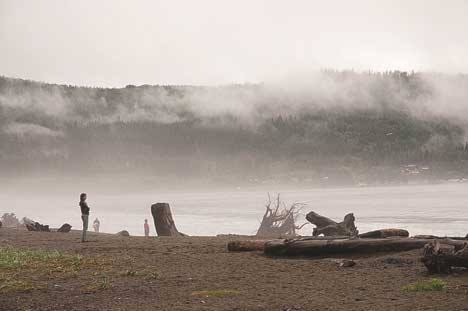
I saw this photograph of the beach, driftwood and people about 15 feet from the trailer. I liked the depth shown by the distance between the people, I liked the soft clouds and the town off in the distance almost obliterated by the clouds.
The photo speaks Port Renfrew to me. I did not notice at the time, but now that I look closely at the couple at water’s edge, she is getting undressed, down to her knickers (as my wife would say), and he seems to be looking at her in a state of shock.
The photograph was shot in RAW, ISO 400, 1/160 @ f6.3, using an 18–70 mm lens at 70 mm. Yes, yes, I did a bit of Photoshop, just a bit, so as to not go against my belief that a photograph should stand alone and not need Photoshop.
What did I do?? While I was still in the RAW editor, I changed the 5650 degree Kelvin to 6500 degree Kelvin just to warm the image up a bit. I also changed the radius in the sharpening box and the amount.
First off I blew the image up 100 per cent and concentrated on the important bits. Then I changed the sharpness amount from 25 to 44 and changed the radius from 1.2 to 1.8. The amount is how sharp the pixels get and the radius is the area around the pixels.
(Look very closely as you slide the knobs and you will see the effects. Make sure that you always underdo in Photoshop instead of overdo.)
Then I opened the image in Photoshop and converted it to a 4x6-inch JPEG so that I could e-mail it as a small attachment.
Any questions? E-mail me at nsilverstone@telus.net.
Norman Silverstone teaches photography through North Island College and Eldercollege in Port
Alberni.